
Until recently if you asked me about backup providers, I would have talked about the likes of Veeam, StorageCraft, or even Commvault. Why this selection? They are all providers I’ve worked with or evaluated in the past, however this does indicate a “you don’t know what you don’t know” problem.
For example, Synology has always just been a “storage” company in my mind. While I knew you could run certain workloads on them, I had no idea they have their own suite of backup tools.
Turns out I was very wrong on that front. Synology have a suite of options under an “Active Backup” umbrella that could be a compelling, and complete, solution for small businesses.
Test Lab
My home lab environment is close to what you might see in a small business here in New Zealand, with a single managed switch that connects to a router and a fibre internet connection. There’s a Hyper-V host that pulls double duty as a file server, one desktop workstation and a laptop that comes and goes from the network.
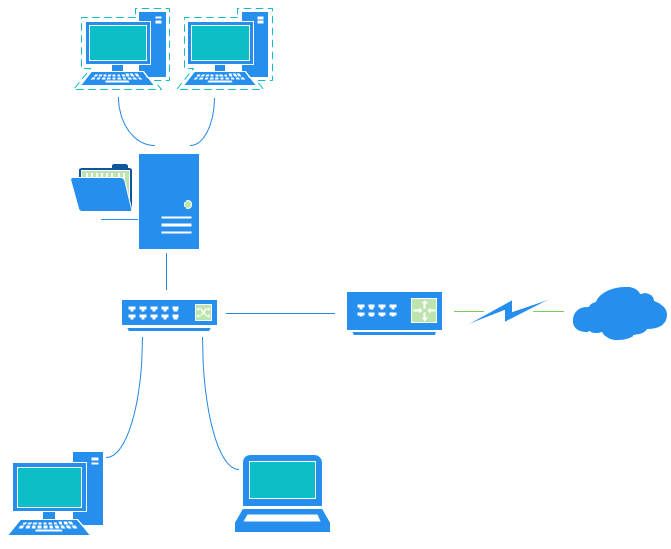
This might be a small retail business, with a single point of sale machine, a supervisor on a laptop, and the point of sale software running on one of the Hyper-V guests. Their email happens to be hosted in an Office 365 tenant.
A Risk, and Possible Solutions
The owner of our fictional small business has realized that they are currently carrying a risk that they are no longer comfortable with. Nothing is being backed up, and day to day they’re hoping none of their hardware fails or a staff member doesn’t accidentally delete some critical files.
They know they need to implement a backup solution, but what?
There’s a lot of option on the table:
- A direct to cloud service, which would allow restoration of deleted files.
- A script written by the owner’s cousin that copies files to an external hard drive, which may or may not allow restoration of deleted files.
- Local backup software, which would allow restoration of both files and entire systems but needs its own management server and storage in addition to the software.
Ideally, our business owner wants both file recovery and the ability to restore their critical Hyper-V virtual machines if there is an issue there. This rules out the first two options above. The third looks like for too much work for a business already running lean and they really want an integrated solution.
A bonus requirement is that they’d also like to be able to back up their Office 365 data. Yes, your data in the cloud is still your problem.
In search of a solution, our business owner came across Synology’s Active Backup Suite. But can it actually meet all of their requirements?
What is Active Backup Suite?
Active Backup Suite is a collection of three Add-on Packages that can be installed directly on a supported Synology NAS:
- Active Backup for Business
- Desktops and Servers via an agent
- VMware and Hyper-V hosts
- File server
- Active Backup for Office 365
- Exchange
- SharePoint
- OneDrive for Business
- Active Backup for G Suite
- Gmail
- Drive
Backup (and business continuity) is one of my passions, and I happen to own the backup subject matter expert portfolio at work. I’ll be frank, prior to Synology getting in touch about reviewing Active Backup Suite I didn’t know it existed. I mentioned the “you don’t know what you don’t know” problem at the start of this post and that rings very true here.
Given the problem statement above and my previous experience I don’t know what I would have ended up recommending. Reading between the lines, I would assume that our fictional small business would be somewhat price-sensitive which immediately rules out a lot of the large enterprise scale backup options.In order to test this out the suite, I’ve added the supplied Intel-powered DS920+ NAS to my home lab and have had it running for a few weeks backing up the other components within it.

Before we jump in, I feel like I should touch on cost. This is happily very simple:
- Buy a compatible NAS, the right size for what you’re backing up.
- Buy enough hard drives and pop then into your NAS such that you’ve got enough space to hold the data you’re backing up.
- Install the Add-on Packages, and you’re ready to go. There’s no licenses or fess to pay for the functionality over and above the hardware.
The Backup Experience
Before looking at the backup experiences themselves I’ll touch on installing the Add-on Packages themselves. This is a matter of finding them in the Package Center within the NAS’ web-based admin interface. If asked if you want to also install the associated portal, do include it as you’ll (generally) need these for restores later.
When you first open each and try to use them they will let you know if you’re missing any prerequisites, for example if you haven’t setup a storage volume to store your backups you’ll be instructed to do so and linked to documentation if needed.
One of these prerequisites is a Synology account which you’ll need to activate each of the packages.
PCs and Servers
The first place I started when exploring the Active Backup Suite was PC (and Server) backups.
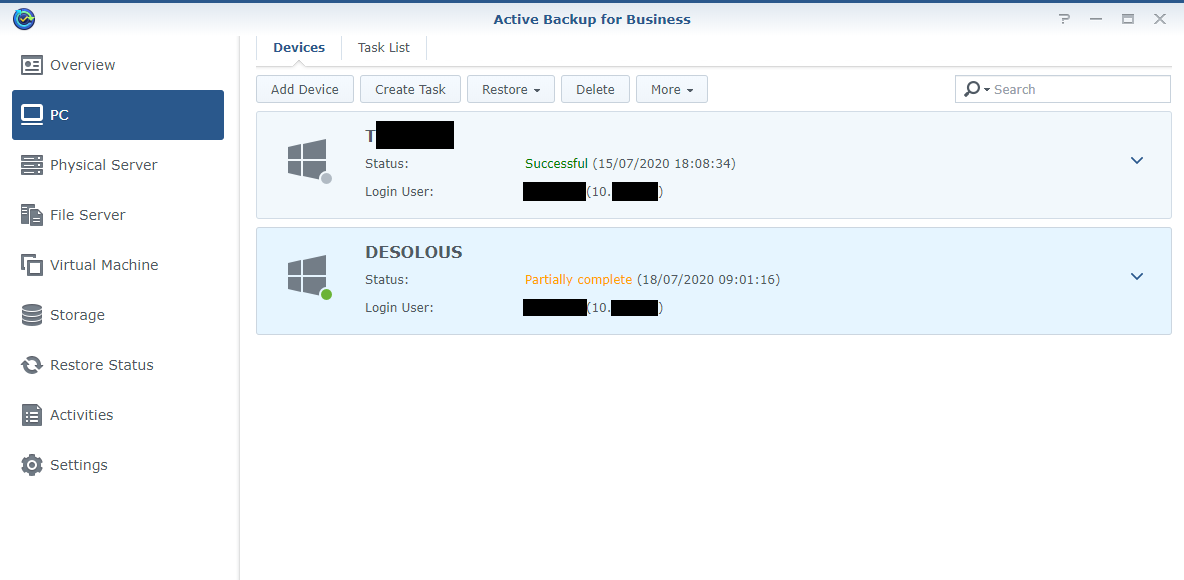
These are both agent-based backups, so when you go to add a new device in from the web interface you’ll be directed to download the agent which you will then install on the PC you want backed up. Once installed, you enter the address of your NAS and the DiskStation Manager account you’ve configure on it.
From there you can configure your task(s) back on the NAS itself, which are the actual backup jobs. Through these tasks you can describe exactly what you want to backup on the PC. The default is the entire device and you choose if external hard drives connected to the device should also be backed up. You can choose to change this to only backup the system volume or can pick a specific set of volumes on the machine.
The schedule options allow you to backup manually, one a schedule, and based on certain events.
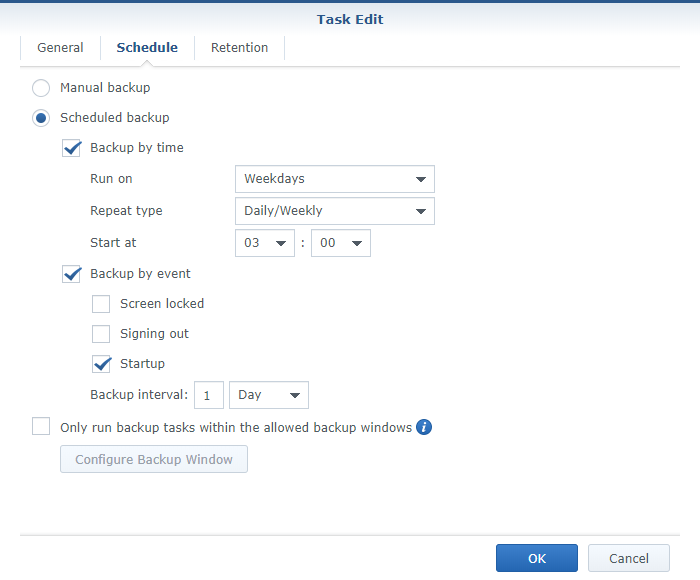
In my lab, the desktop is set to backup at 3 AM just in case it’s left on overnight. Otherwise it will backup at startup once a day. The laptop, on the other hand only backs up at start up, but can do this every four hours as that’s a device that is on and off all day and has a more rapid changes on it.
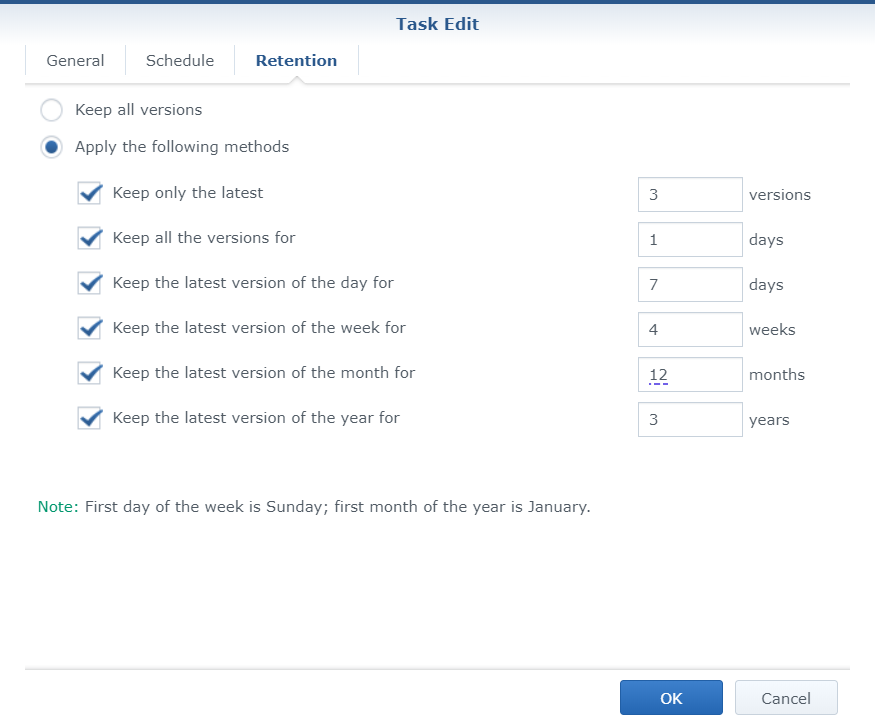
Finally, you can tweak how long each backup point is retained.
These backup jobs work away from now on, based on their schedule or the events you’ve configured. I’ve not noticed any negative impact to performance, which I was expected during the startup triggered scheduled.
File Servers
The file server backup is straight forward and agentless.
Assuming you’re working with a Windows Server based file server, you can setup Active Backup to back it up via SMB by adding a new file server specifying it’s address and an account which can access the desired SMB shares.
Best practice, and you will be reminded about this in the wizard, is to create a specific backup user on your file server for this connection.
Now you need to setup the actual backup task. This includes which shares or folders on your fileserver that you want to backup. You can filter out files you don’t want to backup by file extension or groups of file extension, such as backing up all images and documents but ignoring all videos and music.
Unlike the previous agent-based backups, events aren’t available when setting up the schedule for your file server backups. After all, the office file server generally isn’t something that is “starting up” on a regular basis.
Virtual Machines
Now we get to the final backup option, and perhaps the coolest on the restore options front, under the “Active Backup for Business” umbrella: Virtual Machines.
The first step here is adding your hypervisor(s). You can add both VMware and Hyper-V hosts. Once added you’ll see all of the guests running on your host.

This view also gives you a glanceable view of if the guests are protected. In the above screenshot you’ll see three guests, but only two of them have tick marks on their icons. This indicates that “LabServer01” isn’t configured to be backed up in a task.
Speaking of tasks, there are a number of options to tweak the backup of your virtual guests, including application aware backups using Volume Shadow Copy Service (VSS).
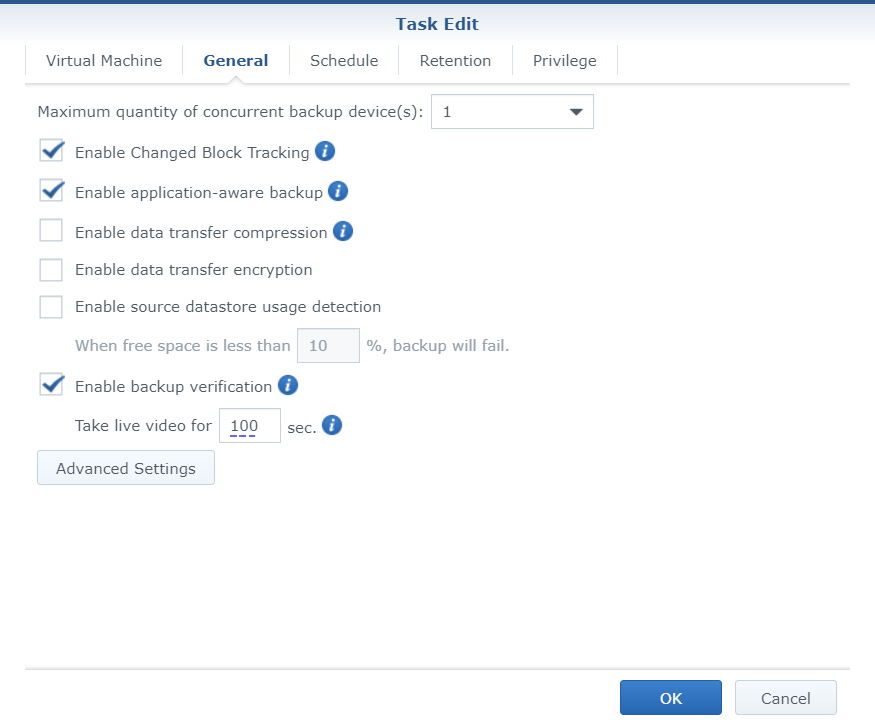
The coolest option on this list is backup verification. This is a spoiler for one of the best restoration options the suite provides, but backup verification uses Virtual Machine Manager on the NAS to spin up your recently backed up VM and record the result. This allows for verification that your backups can be relied on for a successful restore if and when the time comes.
Office 365
I’ve used a few services for backing up Office 365 now, and I’m very impressed with Active Backup for Office 365. The setup was just… simple.
When you create a new task, a window pops up where you log into your Office 365 tenant. Once you’re authenticated you then consent to the permissions Active Backup needs and it’s done and you’re free to configure the specifics of what you want to backup, how often, and how long it should all be kept.
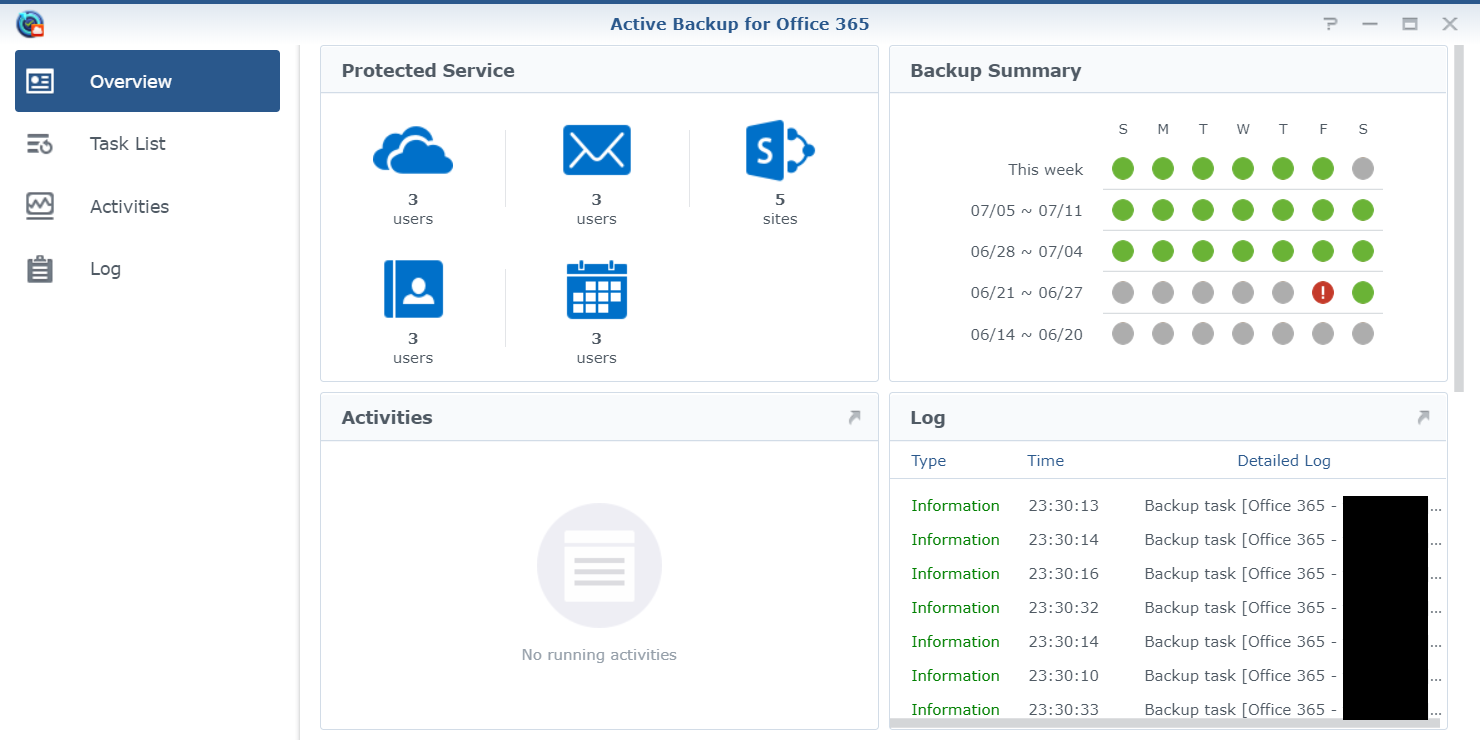
Simple and effective.
G Suite
Coming off of Office 365, I was disappointed by the G Suite setup experience. To be clear, this is a Google problem and not a Synology problem.
There is a lot of work involved in setting up Active Backup for G Suite, and I wish I were exaggerating. I recall it taking over 30 minutes when I went through the process.
Synology does have excellent documentation on the process, but Google has a habit of changing their interfaces and moving things around meaning when you run through the documentation it may take some hunting to find what you’re being told to click.
Once it’s setup, it works great. I just wish the setup were as seamless as for Office 365.
The Restore Experience
Of course, backups are only valuable if you can restore them. This is such a big topic that I’m going to be splitting the VM restoration options off into their own post.
For everything that we will be looking at today, you need to fire up the relevant “portal”.
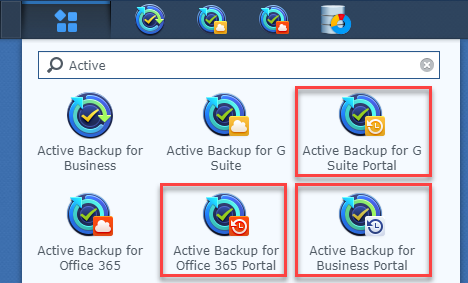
Selecting any of these will open a new tab and you may initially feel a little lost, though finding your bearings is quick.
Business Portal
The first thing when loading up the Active Backup for Business Portal is to make sure you’re “looking” at the device you intend to restore from.
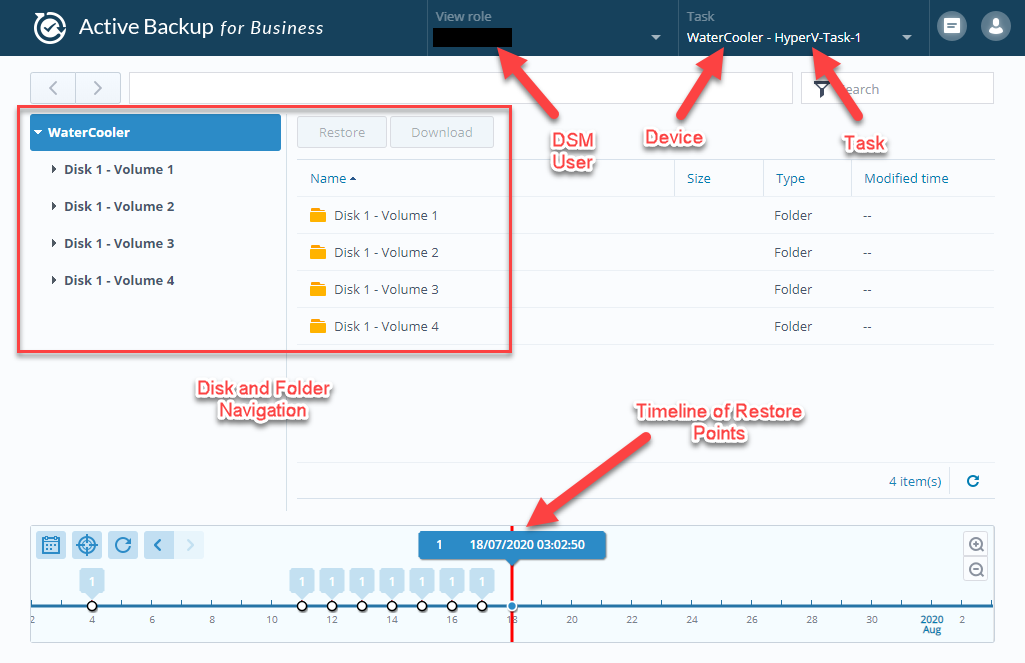
You do this by clicking into the “Task” area at the top right of the tab. This will show you all of the devices being backed up by your various backup tasks. This covers everything from your agent-based laptop backups through VMs (for file stores) and file servers.
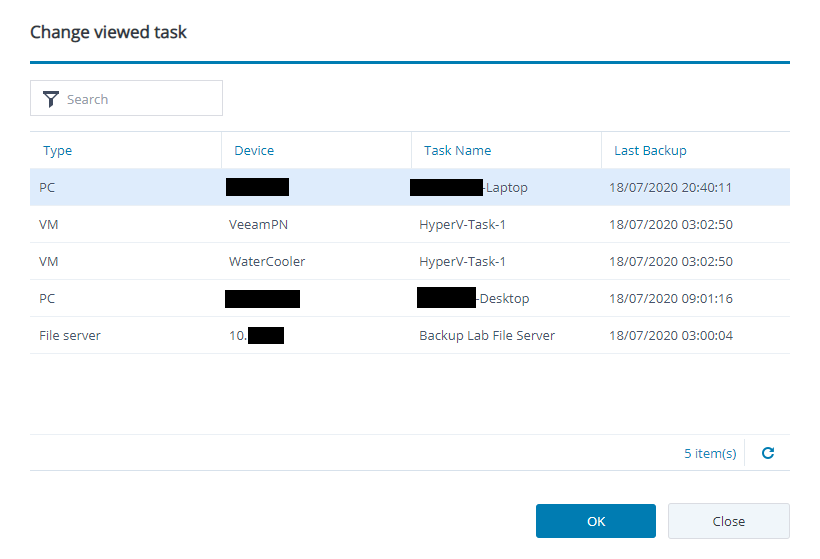
After choosing your device, choose the restore point from the timeline at the bottom of the screen and then navigate, or search, the file system for the files you want to restore.
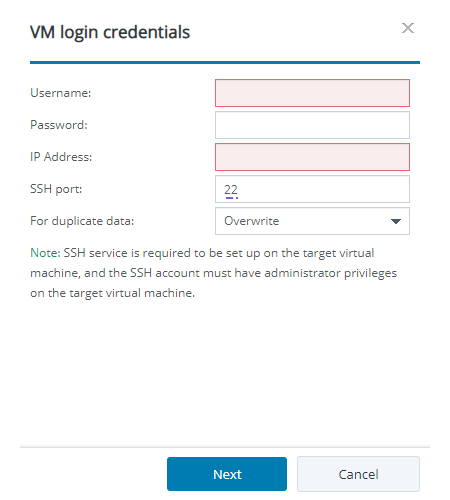
You have two options for file restoration. You can either download the file via the browser to your local computer or restore it back to the protected device. How easy this is depends on the backup type. Agent-based backups can just use that connection to restore the files, however VM based backups may ask for credentials and an SSH service to do the same.
Cloud Portals
The G Suite and Office 365 portals are so similar that I’m only going to show off the Office 365 variant. My comments here apply to both.
When you first load up this portal you might be struck with a sinking “uhh… where’s my data?!”
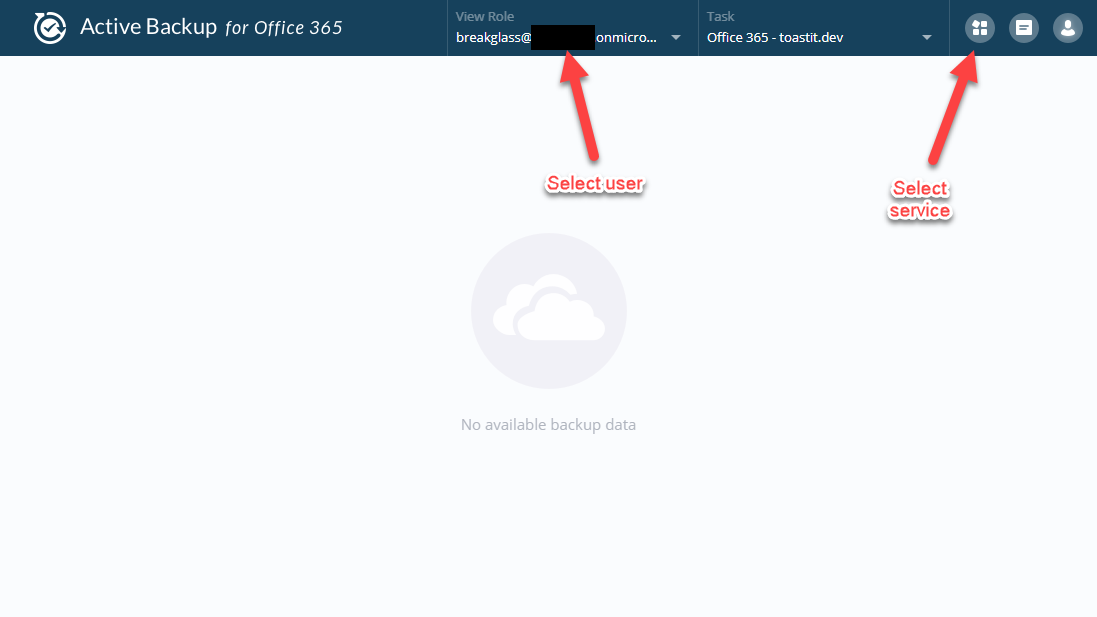
First thing first, make sure you have the right user selected. You choose the target user via the “View Role” section.
Then you need to make sure you’re looking at the actual service you want to restore data from. On Office 365 that would be Exchange for Email, SharePoint for intranet data, or OneDrive for personal files. This option is initially hard to find, it’s one of the circular icons.
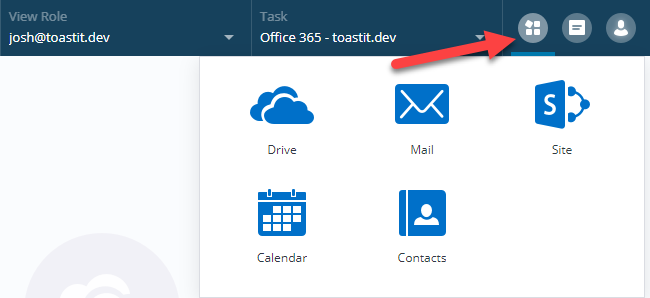
For demonstration, and because I know there’s data there, I’ll click into “Mail”.
Once again, you’ll see a restore point timeline at the bottom of the screen and the main body of the page will allow you to find the item(s) you want to recover.
As with file restores you can both restore items back to their original location or download (also known as export in these portals) them to your local computer.
Thoughts About Active Backup Suite
I’m walking away from this exploration of the Active Backup Suite impressed.
Traditionally I would have considered backup to require several different pieces. At a minimum you’d be looking at specific software, on some sort of management server, and some hardware which may be local to the management server or available across the network.
There are integrated options, which include a managed device that handles both the software and storage but they are generally priced such that it’s hard for them to make sense in a lot of small and medium sized businesses.
The Active Backup Suite does provide a surprisingly complete option.
As a bonus the ability to make a one-off hardware purchase and just have your backup needs “sorted” without having to worry about ongoing software licenses is attractive to a lot of businesses.
Consider a gap in “what I don’t know” filled.
Wish List for Future Enhancements
I’ve only got two suggestions for how the backup suite could be improved.
First, it’d be great to have a unified portal for restores, regardless of this component of the suites was used for the backup. This would likely involve having to add a third selection item along the top of the portal to choose “Business”, “Office 365,” or “G Suite.”
This would eliminate the need to jump around different tabs if you’re looking for a file that you don’t know if it was on the file server or OneDrive.
Second, it’d be good if you could do restores from the main NAS web interface without having to have the portal open in a tab of its own.
I see this being the portal as they already exist, just in a window within the interface like those used for configuring the backup jobs.
Wrap Up and a Teaser
This post ballooned into something much longer than I had originally planned, but I do want to cover the hardware that enabled this review. That will be a post in and of itself.
This means that over the next month or so, mixed in with normal PowerShell content you should see a post about the VM specific restores and also a post on the NAS hardware too.
Credit
Hero image by Jason Dent on Unsplash