
If you’ve seen my recent tweets or my latest blog post, you know that I’m on a bit of an Azure Pipelines kick at the moment. The natural progression of this is merging Pipelines with my primary PowerShell/tech interest… toast.
I realized I was keeping the Pipelines site open as I was pushing commits, waiting to see if the latest build succeeded. Had I broken something? Did I need to pull apart my last set of changes? Nope, all is good, carry on.
Regardless, I’ll probably continue to keep an eye on my build results, but do I really need to keep the site open? I got to thinking, “wouldn’t it be great if I could get a toast notification with the status of each build?”
Well, with a PowerShell Universal Dashboard powered REST API, BurntToast, and an extra task in my build pipeline… I sure can!
As an upfront warning, I’m not proposing this as a viable long term option, nor the best option. This post relies on you exposing a port on your computer to the Internet… proceed with caution!
You Need to Get Some REST API
I’m going to start this journey on my end of things. I need to set up a way to “receive” the data to go on my toast, and fire the toast itself. To do that, I’m going to use Adam Driscoll’s PowerShell Universal Dashboard (PoshUD).
We’re going to be doing what we can to protect our API by requiring authentication. This requires the paid version of PoshUD, and if you try and use it without a license it will only run for an hour.If you find PoshUD useful, please do consider supporting it by buying a license!
This project is available on the PowerShell Gallery so we’ll start by installing it.
Install-Module -Name UniversalDashboard -Scope CurrentUser
Now we’ll get ready for the authentication component. We do this be creating a standard authentication method object and generating a token for our Pipelines task.
$Method = New-UDAuthenticationMethod
$Token = Grant-UDJsonWebToken -UserName 'Pipeline'
Note, once you’ve generated your token, you really don’t want to run that command again with the same user name. Keep the token safe, and keep it available for now as we’ll want to provide it to Azure.
Next, we’ll start defining the API’s endpoint. I’m setting the Url to ‘/toast’ so that I know precisely what it does and the method to POST (strictly speaking any method would work… this one just makes sense). We’ll also list out each of the parameters we need to get from Azure Pipelines.
$Endpoint = New-UDEndpoint -Url "/toast" -Method "POST" -Endpoint {
    param ($Build, $Branch, $Project, $Status, $Commit, $BuildId)
For a little bit of flair, and because the Pipeline’s logo doesn’t look right when it’s cropped into a circle, I’ll change the toasts icon based on the build status. I also trim the commit SHA down to the first seven character as that’s how you see it represented everywhere.
    switch ($Status) {
        'Succeeded' { $Icon = 'https://upload.wikimedia.org/wikipedia/commons/thumb/7/73/images/Flat_tick_icon.svg/images/480px-Flat_tick_icon.svg.png' }
        'Failed' { $Icon = 'https://upload.wikimedia.org/wikipedia/commons/thumb/8/8f/images/Flat_cross_icon.svg/images/480px-Flat_cross_icon.svg.png' }
        Default { $Icon = 'https://upload.wikimedia.org/wikipedia/commons/thumb/d/d9/images/Icon-round-Question_mark.svg/images/480px-Icon-round-Question_mark.svg.png' }
    }

    $ShortCommitSha = $Commit.Substring(0,7)
The final step taken within our endpoint, is the toast itself.
We start by creating a button, which links through to the build results. This means that if I do need to dive into a failure I can get straight to it. Then we fire the toast notification, passing in all of our variables that will soon be coming from Pipelines, the icon, and the button.
    $Button = New-BTButton -Content 'Open' -Arguments "https://dev.azure.com/windosnz/$Project/_build/results?buildId=$BuildId"
    New-BurntToastNotification -Text "$Project $Build - $Status", "Source: $ShortCommitSha", "Branch: $Branch"  -AppLogo $Icon -Button $Button
}
Now, start the API!
$Api = Start-UDRestApi -AuthenticationMethod $Method -Endpoint $Endpoint -Port 8888
Note, we’ve passed in our authentication method and endpoint. The only other thing here is the port that the API is listening on. This defaults to 80, but I changed it to 8888 just so that it was unique on my firewall.
We can now test our API, by building a hashtable of fake data and calling the endpoint via localhost.
$Body = @{
    Build = 'Random'
    Branch = 'Master'
    Project = 'Fake'
    Status = 'Succeeded'
    Commit = '1234567890'
    BuildId = '1'
}
Invoke-RestMethod -Headers @{ Authorization = "Bearer $Token" } -Uri http://localhost:8888/api/toast -Method POST -Body $Body
Of note here, is the form that the authorization takes in the headers parameter. If you don’t get that right, you’ll get an unauthorized error. All going well, you’ll get something like this:
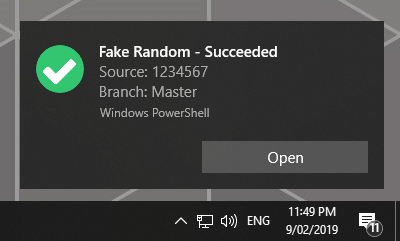
Success!
It also pays to remember how to manually stop this API if you need to.
$Api | Stop-UDRestApi
If you’re unsure about how all of the above snippets fit together, check out the code on GitHub.
Before we move on to Azure Pipelines, make sure that the port have your API on is open on your Windows firewall and port forwarding is configured on your router/modem.
That Cloud Looks Like a Pipe
With our API ready, tested, and waiting, let’s get our pipeline flowing. I’m assuming you’ve already got a build pipeline working and we’re just adding some additional code to an existing base.
Let’s start by defining some variables. Getting there is a bit of a rabbit hole, start by editing your pipeline, then click through to the pipelines settings (if in doubt, click the icon featuring three dots). Head to the Variables tab. We need to add two variables, “APIADDRESS” which contains your public IP address and “APITOKEN” where you’ll throw the token we generated locally.
Remember to click the padlock so that these become secret variables, meaning the values cannot be seen as plain text (you don’t want your personal IP address and token to leak!)

Now let’s add a new task to our build YAML file. This is going to be a PowerShell based task, and we’ll pass in our two newly defined variables as environment variables, making it easy to reference them within the script.
- task: PowerShell@2
  displayName: 'Toast me'
  inputs:
    targetType: Inline
    script: ./azure-pipelines.ps1 -Toast
  env:
    APITOKEN: $(APITOKEN)
    APIADDRESS: $(APIADDRESS)
You’ll note that the script referenced is a generic ps1 file with a toast switch. That ps1 file also contains the code that runs my Pester tests, so I’ll open that up and add the toast code.
if($Toast.IsPresent) {
    $Body = @{
        Build   = $env:BUILD_BUILDNUMBER
        Branch  = $env:BUILD_SOURCEBRANCHNAME
        Project = $env:SYSTEM_TEAMPROJECT
        Status  = $env:AGENT_JOBSTATUS
        Commit  = $env:BUILD_SOURCEVERSION
        Owner   = $env:BUILD_REQUESTEDFOR
        BuildId = $env:BUILD_BUILDID
    }

    $Uri = 'http://{0}:8888/api/toast' -f $env:APIADDRESS

    Invoke-RestMethod -Headers @{ Authorization = "Bearer $env:APITOKEN" } -Uri $Uri -Method 'POST' -Body $Body
}
Remember to add a Toast switch to your param block at the start of this ps1 file.
This should look similar to when we tested our API earlier. This time, however, we’re using the predefined build variables that are available to use to send back real information, e.g. our “Status” is contained in the $env:AGENT_JOBSTATUS variable.
We also use our two custom variables to build up the URI pointing to our API and the token to authorize this call.
If you want to see a “live” example of this code, check it out on GitHub and Azure Pipelines.
With all of this saved, just trigger a new build (whether than be manually queuing it, or pushing a new commit) and cross your fingers…
Success!
The eagle eyed out there will have noticed that the build succeeded despite the Pester test failing… that’s an issue I need to fix in my pipeline. The toast itself displayed exactly what Pipelines told it to (I swear!)
Wrap Up
And now that we’re done having fun, disable the port forward. This is a fun experiment, but probably isn’t the best way to achieve the goal. A better option is probably to reach out to Azure Pipelines and pull the info… it just won’t be as on demand and real time.
Either way, I had fun and I cherish any chance I get to play around with PoshUD.
Expect some more Pipelines content in the coming weeks!