
Coming out of the PowerShell + DevOps Summit and PowerShell Conference Europe there has been a noticeable uptick in new blogs. I’ve also noticed a number of people saying “I want to get into it… but need to figure out x and y first.”
I’ve been meaning to document my workflow (which is sadly lacking in obvious opportunities for automation) for writing blog posts and a little about the backend this blog runs on. Now seems like a good time to get this written, especially if it helps someone get their own blog off the ground.
The Backend
This blog runs on GitHub Pages and you can see all of the code behind it via its GitHub Repo.
That first link has good instructions on how to get started with GitHub Pages. The main thing to remember is that if you commit something to the master branch of the repo, your site will be built automatically. If there are any issues preventing the site from being built successfully you’ll get an email.
I’ve, uh, had a few of those emails…

The biggest thing (for me) was finding a theme I liked. GitHub Pages has a stock selection to pick from, and now even allow you to easily choose from a large selection of community curated themes by editing your configuration file.
In general, any Jekyll theme should work. You can just dump the theme into your repo and see if GitHub manages it to build it, then go from there.
I ended up going with a theme called CodeInventory, which I spent a while tweaking (read: hacking away at for weeks) to morph it into something I was ok with.
Little Green Padlock
You may have noticed that this blog isn’t sitting on the default domain for GitHub Pages (username.github.io). GitHub supports using custom domains, but don’t (yet) support HTTPS when doing so.
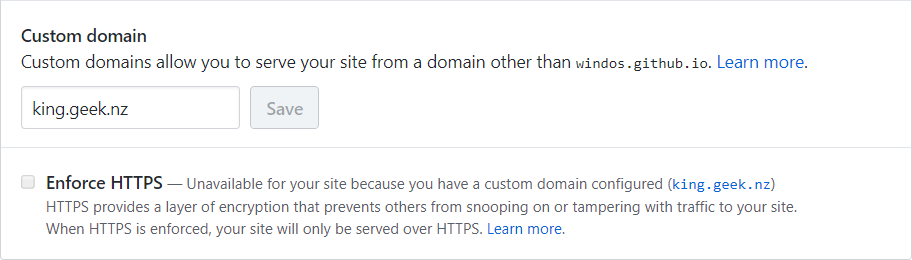
However, this site does have a certificate and it is serving pages up over HTTPS. To do this I’m using Cloudflare. This gave me the added benefit of using them to cache my site all over their network which has improved load times (not that GitHub by itself was all that slow.)
This caching does mean that when I publish a new blog I generally go into my Cloudflare account and purge the cache. If I don’t do this it can take some time for new posts to actually become available to readers.
Get Your Branch On!
Remember when I mentioned that any commits to the master branch will result in a build of your site being triggered? Well then how the heck do you do “drafts” or just, you know, stop work in progress stuff being shown to the entire world?
Branches!
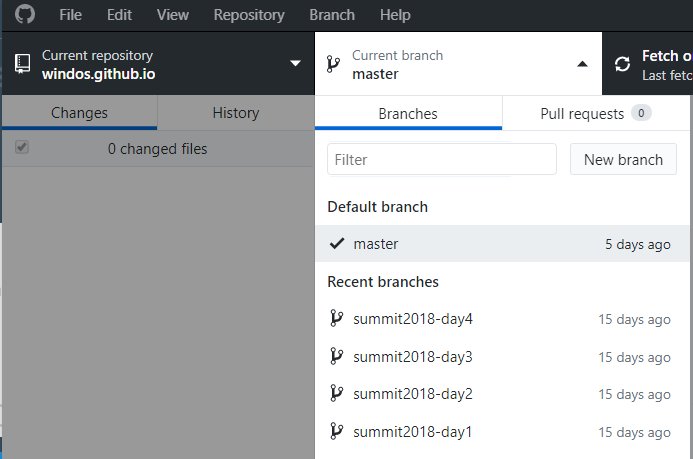
As I write this, I’m making commits to a “blog-workflow” branch, named after the name of this post. The file I’m editing right now is “2018-04-26-blog-workflow.md”.

When I’m all finished writing, I merge the branch into master and the post goes live. You can have as many branches on the go as you like. If you were following along with my Summit recaps, I had used branches to preemptively get the templates, titles and thumbnails for each post ready before I was even on my way over to America.
It All Starts with a Title and an Image
Ok, technically each of my posts starts with the idea for the blog post. But nothing else happens before I have a title and a thumbnail image. I like to have fun with these, and I try to go for “punny” titles (my goal is to make myself laugh!)
For thumbnails I’ll pick one word that summarizes the topic of the post and start searching for an image. I try to keep to creative commons images, generally via Flickr and I always include credit in the markdown file for where the image came from. Bonus points if I manage to find an image that makes me laugh while still actually being related to the topic of the post.
The Template
Next is the template, generally what I do to get this at the moment is make a copy of the previous post and edit it.
Posts are all Markdown files with metadata at the top, and I keep this metadata lean initially (for reasons which will become clear soon), initially it’s just the title and date.
Here is what this post started life as:
---
title: "My Blogging Workflow"
date: 2018-04-26 23:00:00 +1200
---

Text

### Header

Text

### Header

This continues for a while... I'll cut it.

### Header

Text

Also, remember that if you're looking for [PowerShell
help](https://king.geek.nz/images/2018/03/20/pshelp-twitter/), you can find it on
Twitter using
[\#PSHelp](https://twitter.com/search?f=tweets&vertical=default&q=%23pshelp&src=typd)!
Feel the Writage!
Now it’s time to put fingers to keys.
Yes, that previous line made me laugh. It’s important to enjoy this sort of thing.
Normally I’d be editing Markdown files in Notepad++, but I’m terrible at spelling and… English. I’ve not yet found an extension for Notepad++ that can help with this as well as Microsoft Word can.
I do use Notepad++ for the initial template creation and the final clean up before merging to master, such as adding all of the metadata and changing out fancy quote marks for “normal” ones.
In-between those times, when I’m doing the actual writing, I use a Markdown plugin for Word called Writage.
I LOVE this plugin.
I can write my posts in Word, with all of the grammar and spelling corrections it provides. When I press save it ends up as a nicely formatted Markdown file. Bold text uses the correct syntax, as to lists, hyperlinks, everything.
This is what this post looks like when you have it open in Word:
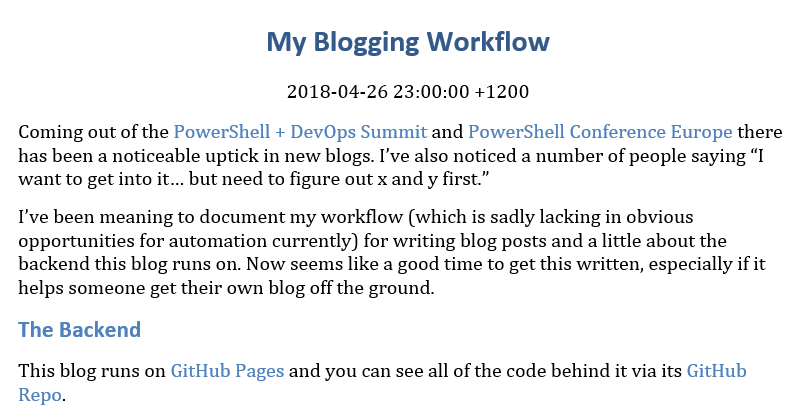
One thing I don’t do via Writage is code snippets. It has a habit of wanting to escape dollar signs and the like. I just note where the code is to go and drop it in with Notepad++ at the end.
Other Tools
I don’t use them enough, but when I include a GIF, it’s generally been recorded using GifCam.
I also pass any and all PNG files through PNGGauntlet. This optimizes PNGs so that their file size isn’t larger than it needs to be (I like to make sure I’m not making my posts load slower than they have to.)
Finishing Touches
Once I’m done writing, I save (including a git commit) and fire the md file up in Notepad++.
I normalize any characters, like quotes and ellipses. I technically don’t have to outside of code samples, but it’s a personal preference.
I drop in all code samples. In this specific posts case, the template from earlier isn’t included yet, but a not telling me to do it later.
Image links are included. Like code these are just noted to deal with them later until this point.
Finally, the rest of the metadata is filled out. The reason I don’t include it from the start is that Writage rips it out when you open the markdown file if it’s something it doesn’t understand. This metadata includes an excerpt (which will show on Twitter and some other social media), the categories/tags, and the thumbnail with credit links.
Once this is done, I’ll read through once to looks for obvious typos and syntax issues.
I’ll then commit and read the rendered Markdown on the GitHub site. I’m looking for anything that didn’t render correctly but I also tend to pick out typos here more so than the previous read through.
Lastly, I merge the post and read the post on my site. My hope is I no longer find any issues, but if I do I’ll correct them and commit directly to the master branch.
Wrap Up
That’s all there is to the mechanics of how these blog posts are done. There are options for automating a number of these steps which I really need to get to at some stage. But the process is working for me at the moment.
Did this post help you get your own blog running? If so, please let me know on Twitter or in the comments. I’ll consider this post a success if it helps even one person!
Also, remember that if you’re looking for PowerShell help, you can find it on Twitter using #PSHelp!