Over the last day or so I’ve been setting up a sandbox/virtual lab which leverages our Veeam backups. We’ve been using SureBackup for automatic restore point verification, but a large software update that’s coming down the pipeline was a really good excuse to get a semi-persistent lab running.
This post goes through the process of setting up a lab from start to finish. I’d found posts that went through parts of the process, usually focusing on the trickier parts, but I didn’t really find any real world, end-to-end walkthroughs.
Keep in mind that the following is as much for “future me” as anyone else, but I do hope you find this useful.
A (PowerShell) Caveat
I’d originally wanted to include the PowerShell method for as much of this process as possible, but unfortunately a lot of the commands just outright aren’t working as advertised for me. This could be an issue with the version I’m running (9.5 Update 3) or our particular VMware setup.
Don’t get me wrong, Veeam’s PowerShell support is awesome, but if it ventures too far into the “advanced”, it can be a little lacking at times. If something isn’t working, or they’re missing something that’s important to you, make sure you let them know!
In my experience Veeam’s support team is one of the best in the industry. Don’t hesitate to talk with them.
The Ingredients
Here’s something I didn’t realize until diving into this; despite marketing terms like “On-Demand Sandbox” being thrown around, this isn’t actually the name of the feature so don’t bother hunting through the console like I did. It’s actually just another way of using SureBackup.
So what is involved? There’s three components which I like to think of as the what, where, and when.
What - Application Group
This defines which VMs will be part of your lab. It can also specify which special role each VM performs and any non-standard timings that are needed. For example, one of your VMs may be a domain control that takes a really long time to boot for whatever reason.
Where - Virtual Lab
There’s a bunch involved here, but at the end of the day this results in an appliance that sits in your virtual infrastructure and acts as a proxy/gateway between your lab and the rest of the network.
When - SureBackup Job
This job links your Application Group with your Virtual Lab. You can set this job to run automatically at certain times (you’d do this for automatically verifying the integrity of your restore points), but this particular job will be run on demand.
Group Your Applications
First, let setup our Application Group. I’m going to assume we’re setting up this lab to test a major software update, which is installed on APP1. This solution is supported by a database on SQL1. For good measure, I’ll make sure we also have a Domain Controller, AD1, available for my identity needs.
Fire up your Backup & Recovery Console, head over to the “Backup Infrastructure” section and look for “Application Groups” under SureBackup. Go ahead and create a new group, give it a descriptive name and add your VMs.
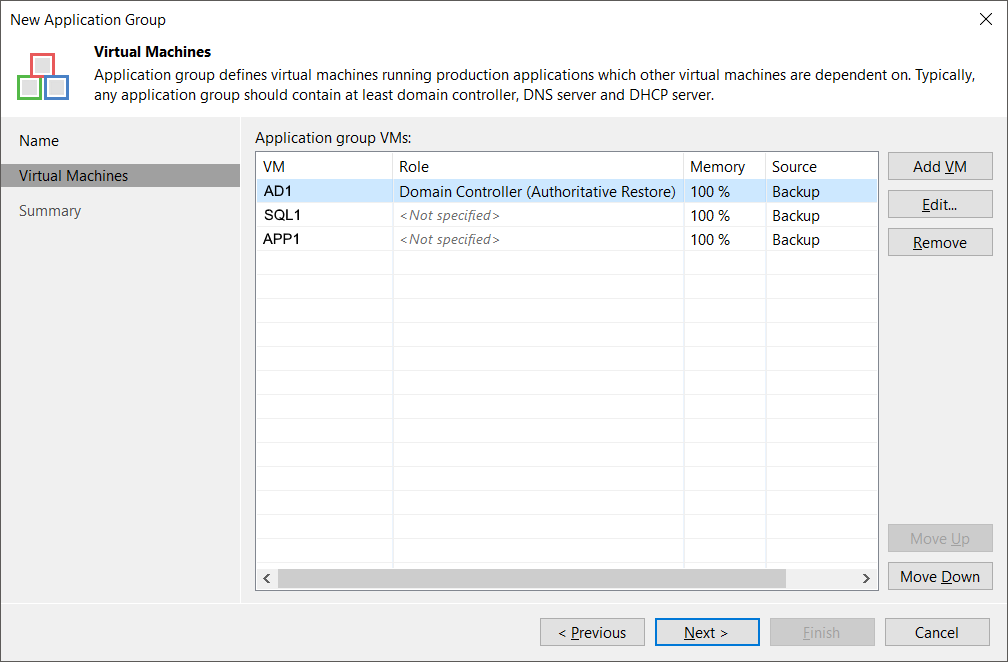
You’ll note that I marked my Domain Controller for an authoritative restore (I had domain trust issues without this.) This is where you can adjust the order in which the VMs are restored, and to tweak any other VM specific settings. Have a look through, and make any changes that suit your needs.
Deploy Your Virtual Lab
Just below “Application Groups” in the console, you’ll find “Virtual Labs.” This is a little more involved than the previous section, so prepare for a few more screenshots.
Again, add a Virtual Lab and give it a descriptive name.
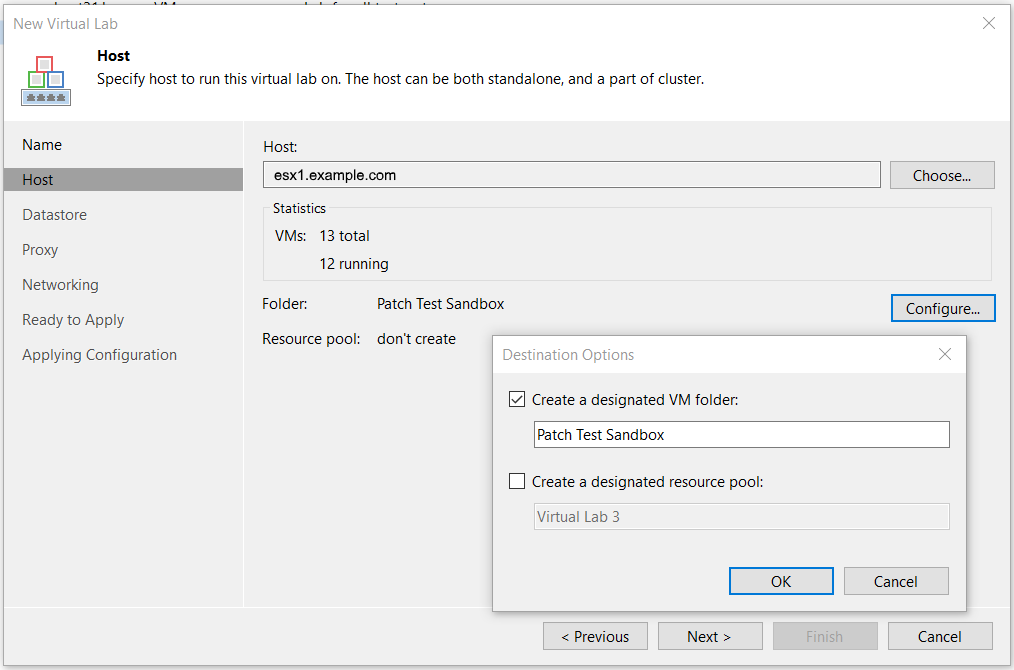
Choose a host which will be the home of your lab. Unfortunately, it has to be a specific host and cannot be a cluster. The wizard will show you some stats about the host you’ve selected, such as how many VMs are currently running on it. Also, click on “Configure” to define a folder into which the lab can be stored in (keeping vCenter nice and tidy.)
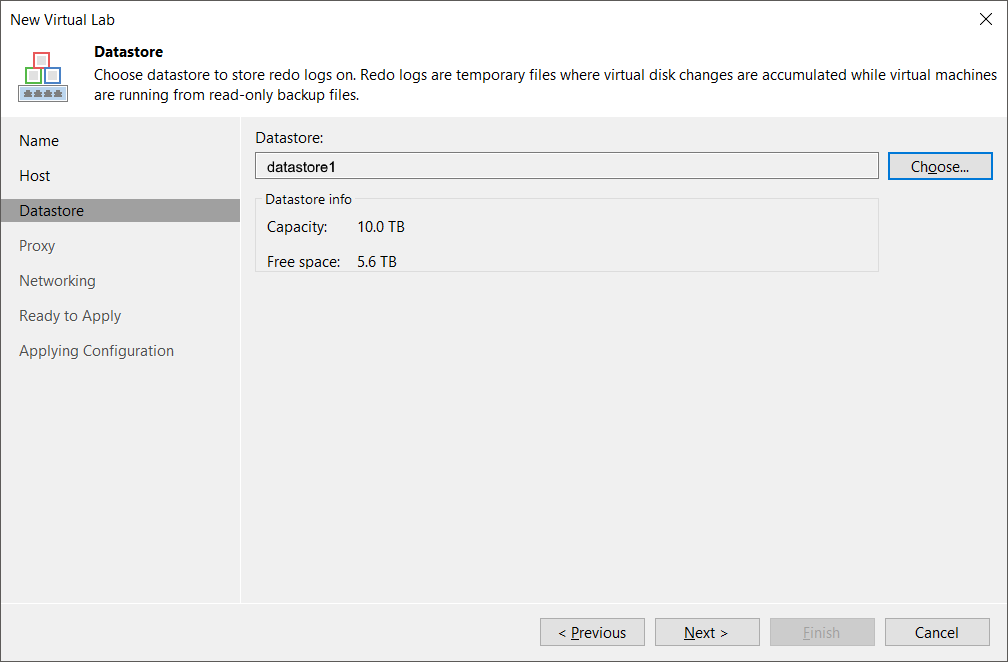
It’s more or less the same process for a datastore, except that there’s no customization.
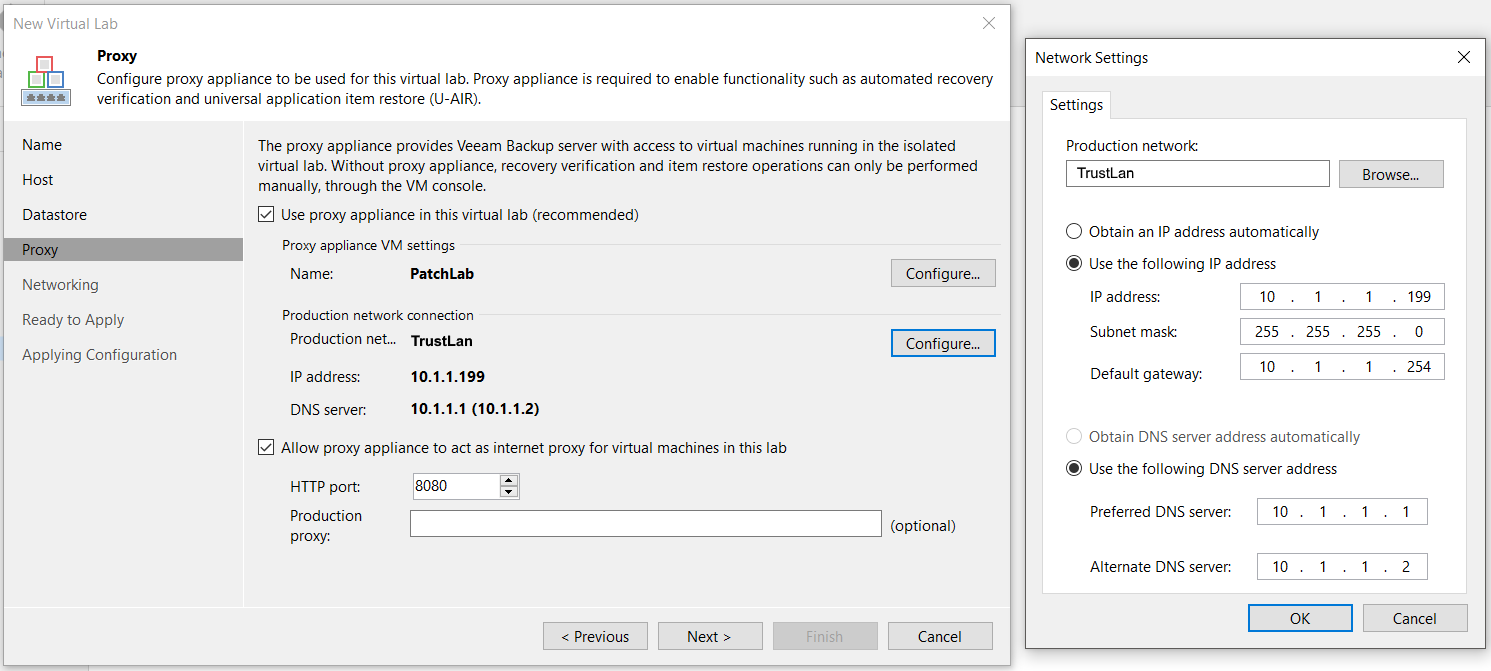
Here’s where things start to get interesting. You now need to configure the proxy appliance for this lab. Give it a name (you will see this pop up in vCenter), set which production network it should connect to, and give it a static IP address. Technically you could let it obtain one from DHCP, but you’ll be routing traffic to this later so I prefer to not risk it moving around.
Also, you can tick a box here to allow the appliance to act as a proxy so that the lab can access the internet. I’ll be assuming that this is what you want during the rest of this post.
You might be able to make use of a basic single-host networking configuration, however my environment meant I had to go for an advanced one.

The defaults on the Isolated Networks page was perfect for me. Make sure you sanity check what’s there.
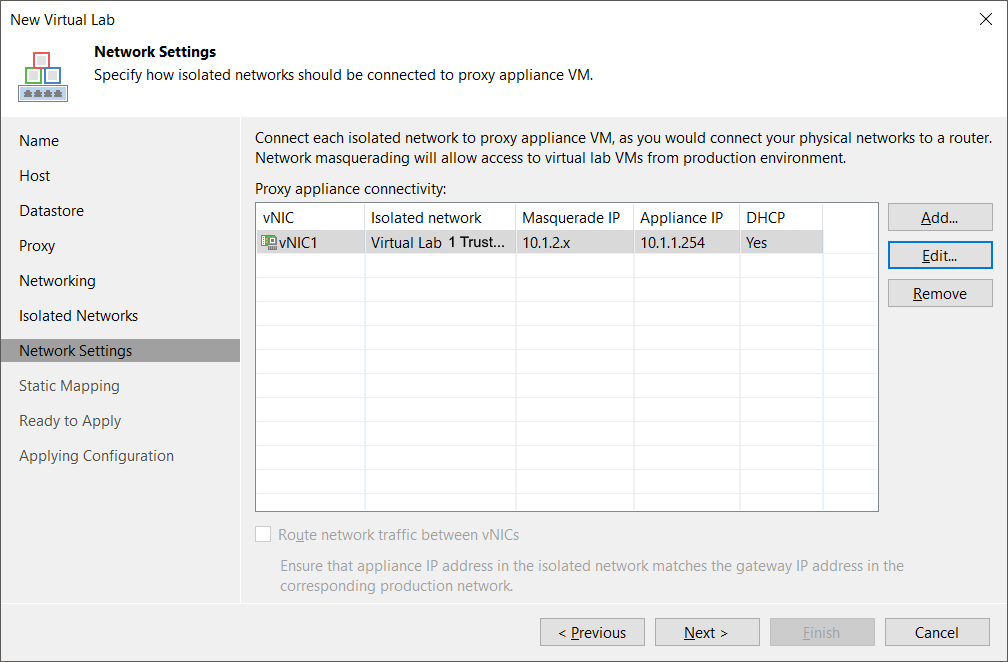
The next page has you configure the internal network for your lab. The two main this here is setting the address which your lab will see the proxy as and what the “masquerade” range should be (we’ll touch more on what this is for later).
Generally, you want to set the address of the proxy to match what would normally be your network’s gateway address, and for the masquerade range pick something that is unique on your network. In this example we’re pretending that the production network is 10.1.1.x, the gateways is 10.1.1.254 and we’ve set our masquerade range to 10.1.2.x.
I didn’t need to define any static mappings, and just completed the wizard.
Mix It Together with SureBackup
The simplest part of this process is creating the actual SureBackup job. Head over to the “Home” section and go to “SureBackup” under “Jobs.”
Create a new job, specifying your Application Group and Virtual Lab.
The only thing to watch out for is the “Keep the application group running after the job completes” check box on the Application Group page. This means that the lab will stay up and the job will keep running allowing you to use the VMs for your testing purposes.
You can set schedules if you want, though I just run my lab on demand.
Finally, go ahead and run the job. Over the next short while you’ll see your lab VMs pop up in vCenter. When the job gets to 99% they’re ready for you… but how?
Getting into the Lab
Remember how we set a static IP for the proxy appliance and a masquerade IP range? Here’s where we’ll use them.
You can set a route on your local machine, pointing all traffic to that range to the proxy’s IP address:
route -p ADD 10.1.1.2.0 MASK 255.255.255.0 10.1.1.199
This didn’t work for me, and I ended up having to set the route on our core switching. The specifics of this will depend on your switch/router vendor, so talk to your network team if you’re not sure.
Once that route is in place you should be able to ping or RDP the servers in your lab (assuming there is not firewalls in the way) using their masqueraded IP. For example if your SQL server is 10.1.1.10 in production, you can reach it via 10.1.2.10 now (note that this is only for prod to lab communication, the environment inside the lab knows no difference, so they all think they’re on the original addresses.)
But what about getting internet access? Jump onto each VM that needs internet, and set a proxy address of that of the gateway (or whatever you set the proxy to) and whatever port you’d configured, it defaults to 8080. That’s it, you’re good to go.
Tear It Down (And Rebuild)
Back in the Veeam console, find your SureBackup job and click stop. It will power down each of the VMs and handle removing them from vCenter. You can now start this again at any time as and when you need it.
Each time you start the lab, you’re VMs will be provisioned from the latest restore points, so refreshing your lab should be as simple as restarting the SureBackup job.
The Bits I’m Still Working On
At the moment, I need to manually update DNS settings on each of my VMs, because the DNS server I’m restoring isn’t one of the two we general default to. I’m also configuring the proxy settings for internet access by hand.
I’m working on scripting this, so that redeploying the lab is even easier (and doesn’t require my input if other people need it.)
Closing Thoughts
That’s it for getting started with a Veeam Virtual Lab. Are you using this feature, or are you a Veeam user that’s been thinking about using SureBackup? Let me know your story/use cases in the comments below or over on Twitter.
Also, remember that if you’re looking for PowerShell help, you can find it on Twitter using #PSHelp!