
This post is part of the #PSBlogWeek PowerShell blogging series. #PSBlogWeek is a regular event where anyone interested in writing great content about PowerShell is welcome to volunteer. The purpose is to pool our collective PowerShell knowledge together over a 5-day period and write about a topic that anyone using PowerShell may benefit from. #PSBlogWeek is a Twitter hashtag, so feel free to stay up to date on the topic on Twitter at the #PSBlogWeek hashtag. For more information on #PSBlogWeek, or if you’d like to volunteer for future sessions, contact Adam Bertram (@adbertram) on Twitter.
In your environment, you may have monitoring tools that fire off emails when a drive has reached certain usage thresholds, or you may have other tools calculating these trends.
This is great, but sometimes it’s helpful to have a script you can run to get a quick overview of all your servers’ hard drives at a particular point in time—whether they’re nearly empty, nearly full, or somewhere in-between. Of course, it helps if the output can be fed down the PowerShell pipeline into other scripts.
Too long; won’t read
If you hadn’t guessed, this post will be discussing a complete script. I’m sure some readers won’t need my explanation to understand the how’s and why’s of it. But if you’re wanting to skip to “the goods,” you can check out the Gist.
For everyone else, know that I’ll be deviating from how I normally do these types of posts. Instead of reading through the finished script line by line, I’ll be talking about the logical flow of how it was built.
This may result in parts not fitting together right away, but I promise it will all fall into place by the end.
Herding the servers
The first thing to sort out is getting a collection of all of our servers. Strictly speaking, our script should take this list as an input, allowing us to tweak the list each time the report is run. However, I run this script the same way every time and have elected to “hard code” the generation of this collection.
$OrgUnit = 'OU=servers,OU=computers,OU=corp,DC=example,DC=com'
$Servers = Get-ADComputer -Filter {(OperatingSystem -like '*Server*') -and (Enabled -eq $True)} -SearchBase $OrgUnit -Properties ManagedBy
That seems like a lot for a simple task, right?
It sure is. I’m being a little over the top with the filtering, but I like doing it all upfront to save some post-processing later.
But what is all of that filtering actually doing?
Firstly, providing an Organizational Unit to the SearchBase parameter means that we’re only looking for computer accounts within that location. There’s no point in grabbing all of our workstations, laptops, and VDI instances when we don’t care about them.
The other filtering means we’re only getting accounts that are enabled and whose Operating System name contains the word “Server.” This will match things like “Windows Server 2012 R2,” meaning I only get our servers and not workstations that have accidentally ended up in the wrong container.
The last thing you’ll notice is that we’re requesting the ManagedBy property. This is so I know who the caretaker of each server is. Armed with a name, I can tap them on the shoulder—or more likely send them an automated email—if I notice a drive that they should be keeping an eye on is nearly full.
Gathering the disks
Now that we have our servers sorted, we need to do a little digging regarding each local disk attached to them. For this, we’ll be querying WMI and then combining the resultant information with details about the parent server.
$WmiSplat = @{
    ComputerName = $ComputerName
    Class = 'Win32_LogicalDisk'
    Filter = 'DriveType = 3 AND VolumeName != "RESERVED_PAGING_FILE"'
    Property = 'DeviceID', 'FreeSpace', 'Size', 'VolumeName'
    ErrorAction = 'Stop'
}

$Disks = Get-WmiObject @WmiSplat
You’ll note that we’re using splatting for Get-WmiObject, a technique where you supply parameters to a cmdlet via a hash table. Other than helping to avoid long line length, it’s not truly necessary in this case. It is, however, what I prefer to do when using many parameters at once, and it’s a good habit to get into.
The parameters themselves are fairly standard. Filtering on DriveType 3 means we’re only going to be getting local disks, as opposed to network or removable ones. In my environment, we used to create disks specifically for page files. Not many of them exist anymore, but if they do, I don’t want to see them in this report. So, we’re filtering them out based on the standard name we gave them.
foreach ($Disk in $Disks) {
    $PctUsed = ($Disk.Size - $Disk.FreeSpace) / $Disk.Size

    [PSCustomObject] [Ordered] @{
        ComputerName    = $ComputerName
        ManagedBy       = $ManagedBy
        DriveLetter     = $Disk.DeviceID
        VolumeName      = $Disk.VolumeName
        SizeRemaining   = $Disk.FreeSpace
        SizeRemainingGB = [Math]::Round($Disk.FreeSpace / 1GB, 2)
        Size            = $Disk.Size
        SizeGB          = [Math]::Round($Disk.Size / 1GB, 2)
        Usage           = New-PercentBar -Percent $PctUsed -BarCharacter '▓'
    }
}
Now, for each disk, let’s wrap up the information we’ve got into a neat custom object. Most of the properties we’re just pulling through directly from the $Disk object. (ComputerName and ManagedBy are coming from the ADComputer object, more on that later.)
Size and SizeGB are two different representations of the same thing; the first measuring the size of a disk in bytes and the second being converted into gigabytes. PowerShell has a nice shorthand for doing this conversion: simply divide the byte value by “1GB,” and this works for other units too. We’re rounding the resulting figure, as conversions like this can tend to end up with many decimal places.
You may be wondering why [Ordered] is slotted in there between [PSCustomObject] and the hash table defining its properties. By default, hash tables don’t have a set order, so even though Usage is defined last, it might end up being displayed first. This is normally fine, but, in this case, I want some control over the output of this script, and [Ordered] is how you tell PowerShell that the order is to be preserved.
Finally, the Usage property is using my PoshPctBar module to display disk usage in a graphical form (for example: [▓▓........]). This is optional and requires installing the module, but I find having this included allows me to quickly pick out problem disks.
What about errors?!
Good catch (pun intended)!
You never know what might cause it—whether it’s that you don’t have permission on the remote server or WMI isn’t responding for whatever reason—but from time to time Get-WmiObject may generate an error instead of “useful” output.
The eagle-eyed reader out there would have noted that the code snippet in the previous section included setting the error action for the WMI cmdlet to “stop.” This is to ensure that any errors from that cmdlet are “terminating” and will be caught using try/catch.
To get some workable error handling, wrap the previous snippet in a “try” block, and then we’ll be able to mitigate them in a “catch” block.
try {
    # Previous snippet
} catch {
    [PSCustomObject] [Ordered] @{
        ComputerName    = $ComputerName
        ManagedBy       = $ManagedBy
        DriveLetter     = $null
        VolumeName      = $null
        SizeRemaining   = $null
        SizeRemainingGB = $null
        Size            = $null
        SizeGB          = $null
        Usage           = $_.Exception.Message
    }
}
With this catch block, we’re creating an object with the same properties as what we previously created. This means they’ll seamlessly output alongside our “working” objects, but with enough information included so that we know which server the error occurred on, and what the message of the error was. The message is just a string and is being included in the Usage property, which is normally a string anyway.
In the context of a catch block, $_ changes to the error that caused the block to trigger. This is why ComputerName and ManagedBy are being supplied as their own variable, rather than properties of a parent object as you might expect to see them.
My screen isn’t that wide!
At this point, we’ve got a lot of properties for each disk—and a few of them are just two different ways of seeing the same value. By default, when there are this many properties, PowerShell will opt to output this information as a list rather than a nicely formatted table.
Ever notice how you’ll often run a cmdlet and only see a subset of the information available unless you pipe the output to Select-Object *?
We’re able to do the same thing with our custom objects by specifying a “Default Display Property Set.” In short, we’ll be telling PowerShell: “Unless I say otherwise, I only want to see this handful of properties.”
But first, we need to establish which properties we want to see:
$DefaultDisplaySet = 'ComputerName', 'DriveLetter', 'SizeGB', 'Usage'
$DefaultDisplayPropertySet = New-Object System.Management.Automation.PSPropertySet('DefaultDisplayPropertySet', [String[]] $DefaultDisplaySet)
$PSStandardMembers = [System.Management.Automation.PSMemberInfo[]]@($DefaultDisplayPropertySet)
Then, we need to “apply” this to each of our objects before pushing them down the pipeline:
$DiskObj = [PSCustomObject] [Ordered] @{
    # Previous snippet
}

$DiskObj | Add-Member MemberSet PSStandardMembers $PSStandardMembers
$DiskObj
Four is the magic number when PowerShell is deciding between a list or a table. We’ll now only see ComputerName, DriveLetter, SizeGB, Usage unless we decide otherwise. The data is still there if we need it.
This is going to take forever to run in my environment!
It probably would if you were to just iterate through each server one at a time. Luckily, there are a few options for running these tasks against more than one target at any given moment.
My go-to for this is PoshRSJob. I use it all the time (perhaps too often). This module simplifies the creation of runspaces, to the point where you barely have to think about (or understand) them.
Most of the previous code, everything except generating a list of servers, gets wrapped up into a script block variable (executable code stored in a variable, similar to a function). As a habit, I refer to this variable as $JobBlock.
$JobBlock = {
    if (Test-Connection -ComputerName $_.Name -Count 1 -Quiet) {
        # DefaultDisplayPropertySet

        $ComputerName = $_.Name
        $ManagedBy = ($_.ManagedBy -split ",*..=")[1]

        try {
            # Previous snippet
        } catch {
            # Previous snippet
        }
    }
}
One thing you’ll note here is the use of $_, which denotes the current server. As mentioned above, some properties that we’ll potentially need inside our catch block are being stored as independent variables.
ManagedBy has a little bit of string manipulation going on to make the output more useful for me. In my case, I only want to know the name of the user, rather than their full distinguished name. You may want to adjust this if you require different information.
You’ll also notice that we’re checking to make sure that each server is online by pinging it once before attempting to gather disk info. This works in my environment because the servers are configured to respond to my workstation.
To get the ball rolling, simply pipe your collection of servers into the PoshRSJob functions as shown:
$Servers | Select-Object * | Start-RSJob -ScriptBlock $JobBlock -Name {$_.Name} | Wait-RSJob -ShowProgress | Receive-RSJob
The servers are going through Select-Object so that the ManagedBy property is available. Start-RSJob is the function doing the heavy lifting of getting our task done; it’s passing each server object into our script block, and the content of the script block is running through for each of them. Just in case, we’re naming each job after the name of the given server, allowing us to troubleshoot if anything goes wrong.
Generally, starting a bunch of jobs would just do that—start the jobs and then return control to you so that you can keep working while they complete in the background. That’s not what I actually want to happen with this script, so we use the Wait-RSJob function to prevent ourselves from performing other actions until they all complete (or fail), and the ShowProgress switch will give us a visual indicator of how many jobs have completed.
Finally, Receive-RSJob will collect the resultant output from each job.
The proof is in the pudding
I’ve not actually shown you any output from all of this yet; it seemed a little premature until it all comes together at the end.
Make sure you have a look at the final product all stitched together, wrapped up as a function with some comment-based help.
But, how do you actually use the thing?
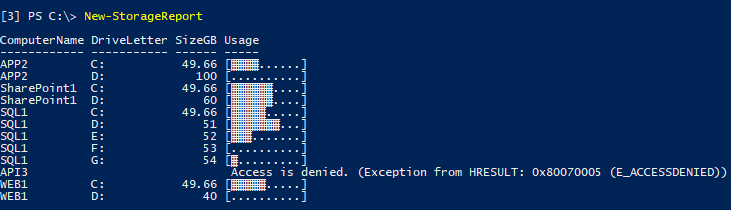
First, just run it directly and view the output inside your PowerShell host:
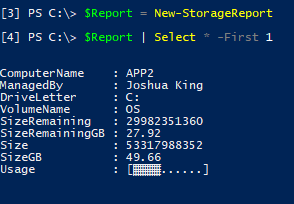
Next, pop the output into a variable for further manipulation:
From here, it’s up to you to tweak as you see fit.
Final thoughts
That was a long journey, looking back at this post, but I hope the result was worth it. Working through this covered a number of topics, and given how many of them there were, I couldn’t dive into them all as deeply as I might have liked to.
If there’s a specific topic you want covered in more detail in a follow-up post, please let me know here or on Twitter.
And finally, please check out the other #PSBlogWeek posts, and follow the hashtag to find other useful PowerShell content!